

DHCP, bilgisayarlara IP adresi ve subnet maskesi başta olmak üzere TCP/IP parametrelerini otomatik olarak dağıtan bir protokoldür.Bu bölümde DHCP havuzu olşturmayı ve interface bazlı DHCP havuzu oluşturmayı göreceğiz.
1. DHCP konfigürasyonu genel yapılandırma ayarları
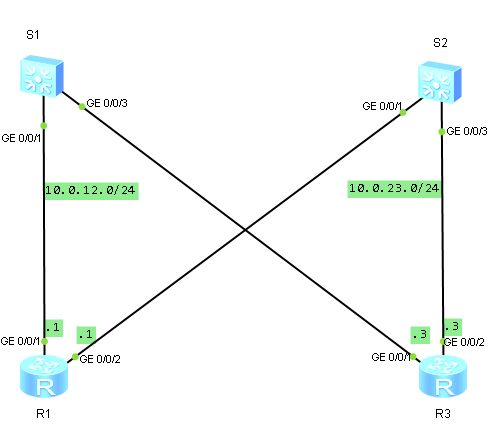
DHCP konfigürasyonu için temel sistem ve ip address yapılandırmasını kuralım.
<Huawei>system-viewEnter system view, return user view with Ctrl+Z.[Huawei]sysname CLIGURU-R1[CLIGURU-R1]interface GigabitEthernet 0/0/1[CLIGURU-R1-GigabitEthernet0/0/1]ip address 10.0.12.1 24[CLIGURU-R1-GigabitEthernet0/0/1]quit |
<Huawei>system-viewEnter system view, return user view with Ctrl+Z.[Huawei]sysname CLIGURU-R3[CLIGURU-R3]interface GigabitEthernet 0/0/1[CLIGURU-R3-GigabitEthernet0/0/1]ip address 10.0.12.3 24[CLIGURU-R3-GigabitEthernet0/0/1]shutdown[CLIGURU-R3-GigabitEthernet0/0/1]quit[CLIGURU-R3]interface GigabitEthernet 0/0/2[CLIGURU-R3-GigabitEthernet0/0/2]ip address 10.0.23.3 24 |
<Huawei>system-viewEnter system view, return user view with Ctrl+Z.[Huawei]sysname CLIGURU-S1 |
<Huawei>system-viewEnter system view, return user view with Ctrl+Z.[Huawei]sysname CLIGURU-S2 |
CLIGURU-S1 ve CLIGURU-S2 ‘ye diğer cihazlardan gelen ve yedek yolları kapatalım.
[CLIGURU-S1]interface GigabitEthernet 0/0/9[CLIGURU-S1-GigabitEthernet0/0/9]shutdown[CLIGURU-S1-GigabitEthernet0/0/9]quit[CLIGURU-S1]interface GigabitEthernet 0/0/10[CLIGURU-S1-GigabitEthernet0/0/10]shutdown[CLIGURU-S1-GigabitEthernet0/0/10]quit[CLIGURU-S1]interface GigabitEthernet 0/0/13[CLIGURU-S1-GigabitEthernet0/0/13]shutdown[CLIGURU-S1-GigabitEthernet0/0/13]quit[CLIGURU-S1]interface GigabitEthernet 0/0/14[CLIGURU-S1-GigabitEthernet0/0/14]shutdown[CLIGURU-S1-GigabitEthernet0/0/14]quit |
[CLIGURU-S2]interface GigabitEthernet 0/0/9[CLIGURU-S2-GigabitEthernet0/0/9]shutdown[CLIGURU-S2-GigabitEthernet0/0/9]quit[CLIGURU-S2]interface GigabitEthernet 0/0/10[CLIGURU-S2-GigabitEthernet0/0/10]shutdown[CLIGURU-S2-GigabitEthernet0/0/10]quit[CLIGURU-S2]interface GigabitEthernet 0/0/23[CLIGURU-S2-GigabitEthernet0/0/23]shutdown[CLIGURU-S2-GigabitEthernet0/0/23]quit[CLIGURU-S2]interface GigabitEthernet 0/0/24[CLIGURU-S2-GigabitEthernet0/0/24]shutdown |
[CLIGURU-R1]interface GigabitEthernet 0/0/2[CLIGURU-R1-GigabitEthernet0/0/2]ip address 10.0.23.1 24[CLIGURU-R1-GigabitEthernet0/0/2]shutdown |
Display interface brief komutu ile switch üzerinde kapattığımız portları inceleyelim.
<CLIGURU-S1>display interface brief…output omitted…Interface PHY Protocol InUti OutUti inErrors outErrorsGigabitEthernet0/0/1 up up 0% 0% 0 0GigabitEthernet0/0/2 down down 0% 0% 0 0GigabitEthernet0/0/3 down down 0% 0% 0 0GigabitEthernet0/0/4 down down 0% 0% 0 0GigabitEthernet0/0/5 down down 0% 0% 0 0GigabitEthernet0/0/6 down down 0% 0% 0 0GigabitEthernet0/0/7 down down 0% 0% 0 0GigabitEthernet0/0/8 down down 0% 0% 0 0GigabitEthernet0/0/9 *down down 0% 0% 0 0GigabitEthernet0/0/10 *down down 0% 0% 0 0GigabitEthernet0/0/11 down down 0% 0% 0 0GigabitEthernet0/0/12 down down 0% 0% 0 0GigabitEthernet0/0/13 *down down 0% 0% 0 0GigabitEthernet0/0/14 *down down 0% 0% 0 0…output omitted… |
<CLIGURU-S2>display interface brief…output omitted…Interface PHY Protocol InUti OutUti inErrors outErrorsGigabitEthernet0/0/9 *down down 0% 0% 0 0GigabitEthernet0/0/10 *down down 0% 0% 0 0GigabitEthernet0/0/11 down down 0% 0% 0 0GigabitEthernet0/0/12 down down 0% 0% 0 0GigabitEthernet0/0/13 down down 0% 0% 0 0GigabitEthernet0/0/14 down down 0% 0% 0 0GigabitEthernet0/0/15 down down 0% 0% 0 0GigabitEthernet0/0/16 down down 0% 0% 0 0GigabitEthernet0/0/17 down down 0% 0% 0 0GigabitEthernet0/0/18 down down 0% 0% 0 0GigabitEthernet0/0/19 down down 0% 0% 0 0GigabitEthernet0/0/20 down down 0% 0% 0 0GigabitEthernet0/0/21 down down 0% 0% 0 0GigabitEthernet0/0/22 down down 0% 0% 0 0GigabitEthernet0/0/23 *down down 0% 0% 0 0GigabitEthernet0/0/24 *down down 0% 0% 0 0…output omitted… |
CLIGURU-R1’in GigabitEthernet 0/0/2 , CLIGURU-R3’ ün ise GigabitEthernet 0/0/1 portunun kapalı oldugunu kontrol edelim.
<CLIGURU-R1>display ip interface brief…output omitted …Interface IP Address/Mask Physical ProtocolGigabitEthernet0/0/1 10.0.12.1/24 up upGigabitEthernet0/0/2 10.0.23.1/24 *down down…output omitted … |
<CLIGURU-R3>display ip interface brief…output omitted …Interface IP Address/Mask Physical ProtocolGigabitEthernet0/0/1 10.0.12.3/24 *down downGigabitEthernet0/0/2 10.0.23.3/24 up up…output omitted … |
2. DHCP’yi etkinleştirelim.
Dhcp default olarak aktif değildir. CLIGURU-R1 ve CLIGURU-R3 üzerinde DHCP’yi aktifleştirelim.
[CLIGURU-R1]dhcp enable |
[CLIGURU-R3]dhcp enable |
3. Global bir ip addres havuzu oluşturalım.
Havuz isimleri,CLIGURU-R1 için pool1 ve CLIGURU-R3 için pool2 olarak oluşturalım. Pool1 ve pool2 için Ip addresleri dağıtılacak olan network’u tanıtalım, gateway’i ve ip address lease(kira) sürelerini belirleyelim.
[CLIGURU-R1]ip pool pool1Info:It’s successful to create an IP address pool.[CLIGURU-R1-ip-pool-pool1]network 10.0.12.0 mask 24[CLIGURU-R1-ip-pool-pool1]gateway-list 10.0.12.1[CLIGURU-R1-ip-pool-pool1]lease day 1 hour 12[CLIGURU-R1]interface GigabitEthernet 0/0/1[CLIGURU-R1-GigabitEthernet0/0/1]dhcp select global |
[CLIGURU-R3]ip pool pool2Info:It’s successful to create an IP address pool.[CLIGURU-R3-ip-pool-pool2]network 10.0.23.0 mask 24[CLIGURU-R3-ip-pool-pool2]gateway-list 10.0.23.3[CLIGURU-R3-ip-pool-pool2]lease day 1 hour 12[CLIGURU-R3]interface GigabitEthernet 0/0/2[CLIGURU-R3-GigabitEthernet0/0/2]dhcp select global |
Display ip pool name <name> komutu ile yaptığımız konfigürasyon ayarlarını görebiliriz.
<CLIGURU-R1>display ip pool name pool1Pool-name : pool1Pool-No : 0Lease : 1 Days 12 Hours 0 MinutesDomain-name : –DNS-server0 : –NBNS-server0 : –Netbios-type : –Position : Local Status : UnlockedGateway-0 : 10.0.12.1Mask : 255.255.255.0VPN instance : —————————————————————————-Start End Total Used Idle(Expired) Conflict Disable————————————————————————–10.0.12.1 10.0.12.254 253 0 253(0) 0 0————————————————————————–
|
CLIGURU-S1 CLIGURU-R1(dhcp server) ‘den management interface’i için ip alsın. Bunu CLIGURU-S2 için de CLIGURU-R3 den ip address alacak şekilde yapalım ve kontrol edelim .
[CLIGURU-S1]dhcp enable[CLIGURU-S1]interface vlanif1[CLIGURU-S1-Vlanif1]ip address dhcp-alloc |
<CLIGURU-S1>display ip int briefInterface IP Address/Mask Physical ProtocolMEth0/0/1 unassigned down downNULL0 unassigned up up(s)Vlanif1 10.0.12.254/24 up up |
DHCP den alacakları Ip addreslerini CLIGURU-S1 için CLIGURU-R1 üzerinde pool1 isimli DHCP pooldan aldığını, CLIGURU-S2 için ise pool2 isimli DHCP havuzundan ip addresi aldığını görüntüleyelim.
<CLIGURU-R1>display ip pool name pool1Pool-name : pool1Pool-No : 0Lease : 1 Days 12 Hours 0 MinutesDomain-name : –DNS-server0 : –NBNS-server0 : –Netbios-type : –Position : Local Status : UnlockedGateway-0 : 10.0.12.1Mask : 255.255.255.0VPN instance : —————————————————————————–Start End Total Used Idle(Expired) Conflict Disable————————————————————————-10.0.12.1 10.0.12.254 253 1 252(0) 0 0————————————————————————- |
<CLIGURU-R3>display ip pool name pool2Pool-name : pool2Pool-No : 0Lease : 1 Days 12 Hours 0 MinutesDomain-name : –DNS-server0 : –NBNS-server0 : –Netbios-type : –Position : Local Status : UnlockedGateway-0 : 10.0.23.3Mask : 255.255.255.0VPN instance : —————————————————————————–Start End Total Used Idle(Expired) Conflict Disable————————————————————————–10.0.23.1 10.0.23.254 253 1 252(0) 0 0————————————————————————- |
Devam etmeden önce global havuzu yapılandırması hem CLIGURU-R1 hem CLIGURU-R3 de tamamlanmış olduğubu kontrol edilmesi önemlidir!
4. Interface tabanlı ip address poolu oluşturalım.
CLIGURU-R1’in g0/0/1 portunu, CLIGURU-R3 için ise g0/0/2 portunu kapatalım.
[CLIGURU-R1]interface GigabitEthernet 0/0/1[CLIGURU-R1-GigabitEthernet0/0/1]shutdown |
[CLIGURU-R3]interface GigabitEthernet 0/0/2[CLIGURU-R3-GigabitEthernet0/0/2]shutdown |
CLIGURU-R1 GigabitEthernet 0/0/2 üzerinden bağlanan client’larin IP adreslerini alması için izin vermesini sağlayalım.CLIGURU-R3 GigabitEthernet 0/0/1 için de aynı işlemi uygulayalım.Yani DHCP ‘yi interface’lere uygulayalım. Henüz dhcp konfügurasyonumuz bitmediği için interface ‘i aktif etmiyoruz.
[CLIGURU-R1]interface GigabitEthernet 0/0/2[CLIGURU-R1-GigabitEthernet0/0/2]dhcp select interface |
[CLIGURU-R3]interface GigabitEthernet 0/0/1[CLIGURU-R3-GigabitEthernet0/0/1]dhcp select interface |
CLIGURU-R1 için GigabitEthernet0/0/2’de ve CLIGURU-R3 içinGigabitEthernet0/0/1’de Dns hizmetleri için kullanacağımız ip addresslerini dağıtmamasını/ayırmasını sağlayalım, dns adresini ve ip adresi lease süresini ayarlayalım.
[CLIGURU-R1-GigabitEthernet0/0/2]dhcp server dns-list 10.0.23.254[CLIGURU-R1-GigabitEthernet0/0/2]dhcp server excluded-ip-address 10.0.23.254[CLIGURU-R1-GigabitEthernet0/0/2]dhcp server lease day 1 hour 12 |
[CLIGURU-R3-GigabitEthernet0/0/1]dhcp server dns-list 10.0.12.254[CLIGURU-R3-GigabitEthernet0/0/1]dhcp server excluded-ip-address 10.0.12.254[CLIGURU-R3-GigabitEthernet0/0/1]dhcp server lease day 1 hour 12 |
Displap ip pool interface komutu ile yaptığımız konfügürasyonu kontrol edelim.
<CLIGURU-R1>display ip pool interface GigabitEthernet0/0/0/2Pool-name : GigabitEthernet0/0/0/2Pool-No : 1Lease : 1 Days 12 Hours 0 MinutesDomain-name : –DNS-server0 : 10.0.23.254NBNS-server0 : –Netbios-type : –Position : Interface Status : UnlockedGateway-0 : 10.0.23.1Mask : 255.255.255.0VPN instance : —————————————————————————–Start End Total Used Idle(Expired) Conflict Disable————————————————————————–10.0.23.1 10.0.23.254 253 0 252(0) 0 1————————————————————————– |
CLIGURU-S2’nin manegement interface’i için yeni bir ip adress aldırmak için; aldığı ip’yi bırakıp , yeni bir ip alması için kapatıp tekrar açalım.
[CLIGURU-S2]interface Vlanif 1[CLIGURU-S2-Vlanif1]shutdown[CLIGURU-S2-Vlanif1]undo shutdown |
DHCP server ağ üzerinde aktif olmasına izin vermek için İnterface G0/0/2’yi etkinleştirelim.
[CLIGURU-R1]interface GigabitEthernet 0/0/2[CLIGURU-R1-GigabitEthernet0/0/2]undo shutdown |
<CLIGURU-R1>display ip pool interface GigabitEthernet0/0/0/2Pool-name : GigabitEthernet0/0/0/2Pool-No : 1Lease : 1 Days 12 Hours 0 MinutesDomain-name : –DNS-server0 : 10.0.23.254NBNS-server0 : –Netbios-type : –Position : Interface Status : UnlockedGateway-0 : 10.0.23.1Mask : 255.255.255.0VPN instance : —————————————————————————–Start End Total Used Idle(Expired) Conflict Disable————————————————————————–10.0.23.1 10.0.23.254 253 1 251(0) 0 1————————————————————————– |
<CLIGURU-S2>display ip interface brief…output omitted…Interface IP Address/Mask Physical ProtocolMEth0/0/1 unassigned down downNULL0 unassigned up up(s)Vlanif1 10.0.23.253/24 up up |
CLIGURU-R1’in G0/0/2 adres poolundan vlanif1(manegement interface)’in ip address aldığını görüyoruz.
CLIGURU-S1’in manegement interface’i için yeni bir ip adress aldırmak için; aldığı ip’yi bırakıp , yeni bir ip alması için kapatıp tekrar açalım.
[CLIGURU-S1]interface Vlanif 1[CLIGURU-S1-Vlanif1]shutdown[CLIGURU-S1-Vlanif1]undo shutdown |
DHCP server ağ üzerinde aktif olmasına izin vermek için İnterface G0/0/2’yi etkinleştirelim.
[CLIGURU-R3]interface GigabitEthernet 0/0/1[CLIGURU-R3-GigabitEthernet0/0/1]undo shutdown |
Interface havuzundan ip addresi aldıgını kontrol edelim.
<CLIGURU-R3>display ip pool interface GigabitEthernet0/0/0/1Pool-name : GigabitEthernet0/0/0/1Pool-No : 1Lease : 1 Days 12 Hours 0 MinutesDomain-name : –DNS-server0 : 10.0.12.254NBNS-server0 : –Netbios-type : –Position : Interface Status : UnlockedGateway-0 : 10.0.12.3Mask : 255.255.255.0VPN instance : —————————————————————————-Start End Total Used Idle(Expired) Conflict Disable————————————————————————-10.0.12.1 10.0.12.254 253 1 251(0) 0 1————————————————————————– |
<CLIGURU-S1>display ip interface briefInterface IP Address/Mask Physical ProtocolMEth0/0/1 unassigned down downNULL0 unassigned up up(s)Vlanif1 10.0.12.253/24 up up |
Ayrıca aşağıda final konfigürasyonda görüldüğü gibi DHCP server’a default static route’un otomatik olarak switch tarafından oluşturulduğuna dikkat edelim.
Final …
<CLIGURU-R1>display current-configuration#sysname CLIGURU-R1#dhcp enable#ip pool pool1gateway-list 10.0.12.1network 10.0.12.0 mask 255.255.255.0lease day 1 hour 12 minute 0#interface GigabitEthernet0/0/1shutdownip address 10.0.12.1 255.255.255.0dhcp select global#interface GigabitEthernet0/0/2ip address 10.0.23.1 255.255.255.0dhcp select interfacedhcp server excluded-ip-address 10.0.23.254dhcp server lease day 1 hour 12 minute 0dhcp server dns-list 10.0.23.254#user-interface con 0user-interface vty 0 4#return |
<CLIGURU-R3>display current-configurationR3#dhcp enable#ip pool pool2gateway-list 10.0.23.3network 10.0.23.0 mask 255.255.255.0lease day 1 hour 12 minute 0#interface GigabitEthernet0/0/1ip address 10.0.12.3 255.255.255.0dhcp select interfacedhcp server excluded-ip-address 10.0.12.254dhcp server lease day 1 hour 12 minute 0dhcp server dns-list 10.0.12.254#interface GigabitEthernet0/0/2shutdownip address 10.0.23.3 255.255.255.0dhcp select global#user-interface con 0user-interface vty 0 4#Return |
<CLIGURU-S1>display current-configuration#sysname CLIGURU-S1#dhcp enable#interface Vlanif1ip address dhcp-alloc#ip route-static 0.0.0.0 0.0.0.0 10.0.12.3#user-interface con 0user-interface vty 0 4#Return |
<CLIGURU-S2>display current-configuration#sysname CLIGURU-S2#dhcp enable#interface Vlanif1ip address dhcp-alloc#ip route-static 0.0.0.0 0.0.0.0 10.0.23.1#user-interface con 0user-interface vty 0 4#return |